Since the start of this semester, I have been planning to download Instagram so I could blog about it, per the requirement for my Social Internet class that we blog about social media tools we have never used. However, it wasn’t until recently, when I was staring at the picture I took of my tennis shoes for one of my blog posts, Running Joke, that I decided I could actually get some good use out of the app. Sure, the photo I shot with my phone was fine. It got the point across, and my tennis shoes are pretty cute, so it was an okay picture. I even styled it up some with more props (i.e. my earbuds and water bottle). But the lighting was pretty dreadful — flat and boring — and I felt the picture could have used some spicing up, especially since it was destined for my blog post header.
Therefore, armed with information from DMCrim’s Instagram blog post, I deleted a couple of less-used apps from my phone (#AndroidStorageProblems) and downloaded Instagram, as well as OneDrive, so I could attach my new brilliant photos to my blog posts more easily.
Once the Instagram app downloaded, my first order of business was to immediately tap every button on the screen to see what they do, my SOP for new things. I would not do well at the controls of an airplane.
Once I had learned my way around a little, I decided to retake the photo of my tennis shoes and see if I could make it better, a la Instagram. So, I snapped the picture and went to work.
For reference, here is the original, without alteration:

I quickly discovered two things:
1) One of the first filters is named “Amaro,” which made me think of a character from one of my favorite TV shows, Law & Order: SVU.
and…
2) THERE ARE SO MANY FILTERS — HOW DO YOU CHOOSE JUST ONE?!?!?! With my aforementioned propensity for button-pressing, I obviously had to try out. Every. Single. Filter. After some serious consideration, I chose X-Pro II.

I then added some warmth, saturation, and shadow effects, and I sharpened up the image a bit.

It was around this time that I realized if you press the picture itself, it shows you the original image until you release — a really great feature! I was wondering how different the picture looked. As it turns out, a lot more different than I expected.
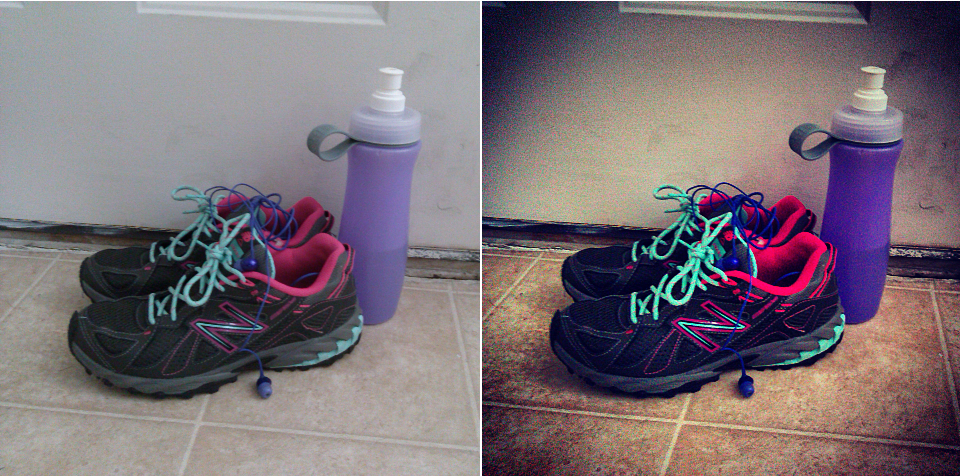
before and after
Once I was done editing, I decided to share the picture on Twitter. I thought it was a good tie-in, since it was my first Instagram photo (an app which I initially thought to download to blog about it for class) and I had created a new Twitter account specifically for my Social Internet class (I never used my old one and it was full of random junk).
So, with little time and effort, I downloaded a new app, learned how to use it, manipulated a photo, and shared it with the world via two social media sites, Twitter and Instagram. I now have a new tool to use when creating visually dynamic pictures for my blogs, as well as a way to share glamorous, edited images with friends and family. I would definitely call this exploration of new social media a success! Now, if you will excuse me, I have a blog post header to change…

Glad my post could help!!
LikeLiked by 1 person
Thanks for trying! Now, the next step is to dive into the social aspects of Instagram.
LikeLiked by 1 person
I always find myself going with the Chrome filter. But then again, Lo-Fi is good, too. But Kelvin has that nice warm look. And Amaro is nice as well… But I also like the authenticity of #nofilter.
You’re right, there are too many options.
Instagram quickly found its way onto my front page of apps (iOS). I hope you enjoy it! Thanks for sharing 😀
LikeLike
I still have a lot to learn with it — especially the social media aspect of it — but I think it’s a fun app to play with, for sure. 🙂
LikeLike
Thanks for the great advice! I was just downloading Instagram’s app onto my phone this weekend to add some effects to a photo. I’ll give your tips a try and check out your inspiration – DMcrim’s Instagram Blog Post.
LikeLiked by 1 person
Good luck! Happy photo-gramming! 🙂
LikeLike